July Terrain Project
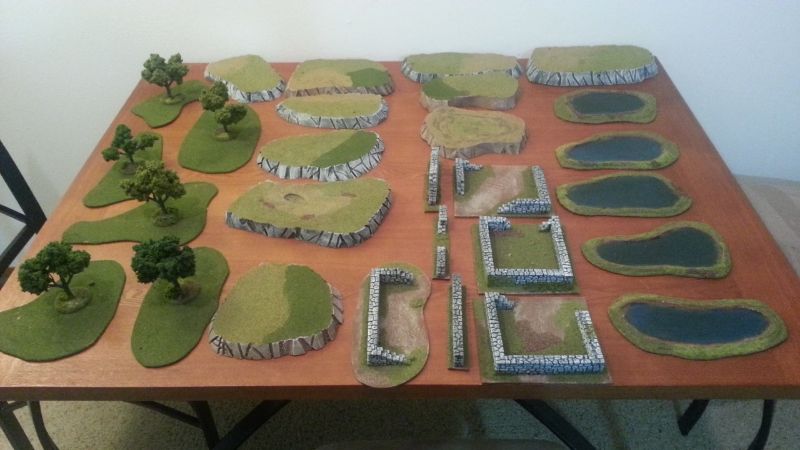
I spent the majority of July working on a variety of terrain types. I wanted to give our local game stores so more terrain and I also made some terrain for some people I know. I'm debating selling some terrain as well, so I wanted to see how much time it would take me to make various batches of terrain.
I also have some fun making a multi layered terrain piece. I like the idea of a piece of terrain really being 2 or more types of terrain. I have made rough terrain hills in the past as an example.
The sections I will cover today
- Hills
- Water pieces
- Forest pieces
- Ruins and some Stone Pillars.
- Mega Terrain - Forest/hill/water pieced
Hills
I have made hills in the past that I was happy with, but they lacked a bit of style. I also am in a contest internal battle of making terrain as playable as possible, but still wanting terrain to look good. In the past my hills have looked like this.
Going forward I want to add a bit more style. First I simply cut out some shapes in some pink foam from Home Depot.

The hills are still fairly straight, but I have cut some angles into the side with the Hot Wire knife shown on the side.

I am going to make some different color hills as well. This is really a big experiment to see how a variety of different styles will look when done.

The dry brush phase is always pretty quick and easy.

I use a combination of the 2 blended turf flock from Woodland scenics. I find the result of mixing these two to look the nicest on hills/most terrain pieces

Here is the final result on my hills. I'm very happy with how these look. Next time I may use even less flock and make multi layer hills.

Water Pieces
I always enjoy having some nice water pieces of terrain, and I wanted to see if I could mass product some good water pieces.
I have used some caulk I bought at Wal~Mart. It is about $5 for a tube of cualk, and I used the entire tube to make these pieces.

After the pieces dry I paint the basic colors on the terrain pieces. I use a combination of blue/green for the base of water effects. I make the middle of the pieces a bit darker.

After the first layer drys I then add in a little more detail.

I use water effects by Woodland scenics. it costs about $20 per bottle and I used an entire bottle making these pieces. This is layer 1 of 3.

The first layer takes 24 hours to dry. It also really things out. The second layer is added and I put in a combination of blue/green dyes and mixed it into the water effects. This really gives some variety to the final product

You can see the difference while it dries based on how much green/blue ink I added to the water effects.

The last layer of water is added (I missed the picture, but I also lightly sprinkle some flock into the water to give it a "moss" type effect.
After that layer drys I think work on flocking the base. Here I am putting some glue on the sides of the base.

This is just another picture of the mixture of 2 flocks I use.
I just pour this all over the sides of the base.

I like to leave the edge by the water brown. The next 2 pictures also show some other flock colors added to the piece for additional effects.


Forests
I've covered how I make forests before. This will be a brief overview. Step 1, get all the pieces out ready to be flocked.

I user the darker green flock for this. i want the pieces to stand out more as a foreste.

This time I have attached all the trees to 50mm bases.

I have flocked all the bases for the trees.

I use a wide variety of materials to add in the final touches to the bases of the trees.

some examples of final tree bases.

Ruins & Standing Stones
I made a couple standing stone pieces. Sadly I did not do any in progress pictures.

I have gone over making small wall / ruin pieces many times. I am gong to just quickly show some pictures of what I have done. These were all made with Hirst Art molds.

I have applied the base colors

Drybrush on the stone is done first.

I did some more ground effects as well.

Here is the final product with some additional flocking material being used on a lot of the pieces.

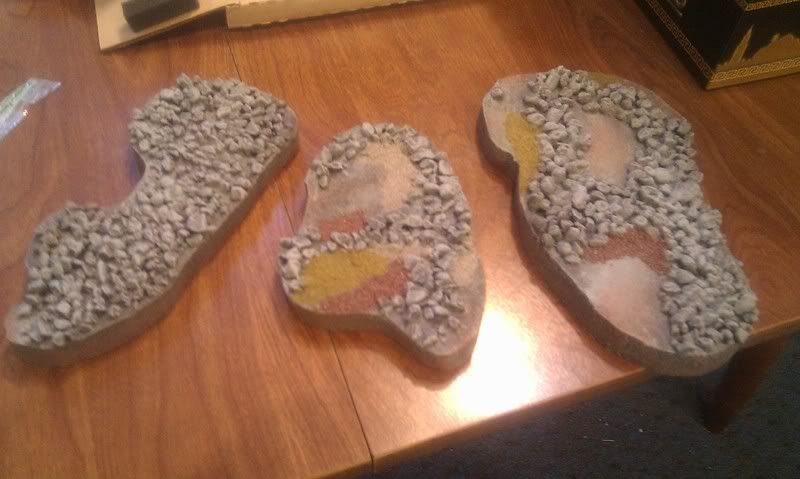
Forest/Hill Water Terrain Piece
I have always liked the idea of making multi piece terrain. In the past I made some rough terrain hill pieces. This is an initial test piece.
I put a template down to see how much space a forest piece would take, and used some Caulk to make the outline of the water piece.

I then applied the gravel bits to the piece. (except where water/forest will be)

I then painted/dry brushed the initial layers on the piece.

Here is the piece with some flock and the first layer of water.

This is the final look of the initial piece.

No comments:
Post a Comment